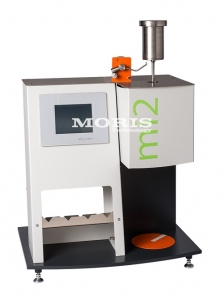
Lydymosi srauto nustatymo mašina MI2.1
Introduction
Flexible, compatible, systematic:
Step by step from the simplest starter model mi2.1 up to the top equipped half-automated mi2.3.
The Evolution of the melt index measurement!
The mi2 melt indexer series can carry out measurements according to ISO 1133 and ASTM D1238, procedures B, as well as ISO 1133 and ASTM D1238 procedure C for the "Half Height / Half Diameter" standard and ASTM D1238 procedure D (optional, only available for device type mi2.2) for the FRR test (Flow Rate Ratio) and ASTM D 3364. Also the manual procedure A is possible to perform.
The technical highlights
Brilliant 14.48 cm (5.7") Color-VGA Touch screen display for the operation, program control and display of the measurement results
Ergonomic compact housing
High-precision timer with a resolution better than 0.001 s
Temperature control algorithm, resolution 0 to 320°C: 0.01°C, 320 to 500°C: 0.1°C
High-resolution position transducer to measure volume output
Additional features for all mi2 device types:
Single weight mode for tests with one weight
Free selectable test range from 50 to 0 mm before the die
Storage of up to 500 parameter sets with 3000 measurements for each parameter set
Capillary/die quick-release and locking mechanism
Base weight 0.325 kg
Electrically heated test chamber for high precision and stability of the test barrel temperature
5 Calibration settings for set temperatures with dedicated parameter files
Manual and timer-programmable on/off override switch for the heaters
Built-in USB-connection (Data Stick) for data back-up
Serial connection to communicate with the optional scale
Ethernet-connection (LAN)
Integrated Web-Server
Wide range of optional accessories
The basic device mi2.1 consists of the following components:
Housing: Ergonomic compact housing for safe test and maintenance procedures. The 4 feet are adjustable in height, which facilitates leveling of the equipment
Test chamber: The insulated test chamber is heated with two heating circuits. The test barrel is easily accessible from top and below for cleaning
Test barrel: Diameter 9.55 mm
Capillary: Capillary, 2.095 mm diameter, 8 mm length, constructed from tungsten carbide and serial number engraved
Die quick release and locking mechanism: The capillary is held and released by the quick-locking mechanism, which works simply and fast. Thus the test channel can be cleaned user friendly
Test piston with test weight 0.325 kg: This test weight is affixed atop the ISO or ASTM specified piston. The assembly has a total weight of 0.325 kg. The test piston shaft has reference rings as reference marks for the ISO and ASTM standard measuring zones
Digital position transducer: High-resolution digital encoder to measure volume output
Color-VGA-Touch screen: For the input of parameters, for program control and for the display of results
Compact I/O-Module: For control and to receive input signals
Temperature Controller: The test chamber temperature is controlled by a special temperature control algorithm. The temperature set points are entered via the touch screen display. During the test, the temperatures are displayed on the screen with a 0.01 °C resolution
USB Connections: to communicate with a PC, or to connect to a data stick for data back-up in ASCII-Format
Ethernet-connection: LAN connection and communication with MFRView software or with a networkable printer.
Also for use as FTP or Web-Server
Serial Connection: Connection to a scale
Technical specifications:
Standards: ISO 1133 / ASTM D 1238 / ASTM D 3364
Barrel - Diameter: 9.555 - 0.01mm (0.376 inches) / Length 168 mm (6.6142 inches)
Capillary - Diameter / Length: 2.095 ± 0.003 mm (0.0825 inches) / 8 ± 0.025 mm (0.315 inches)
Diameter / Length (Option): 1.05 ± 0.005 mm (0.0413 inches) / 4 ± 0.025 mm (0.1575 inches)
Material: Tungsten carbide
Test Piston - Diameter: 9.48 - 0.01 mm (0.3732 inches) / Length: 220 ± 0.2 mm (8.6614 inches)
Weights - Test weights: 0.325 kg (1.000 kg, 1.050 kg, 1.200 kg, 2.16 kg, 3.8 kg, 5.0 kg, 10.0 kg, 12.5 kg, 15.000 kg, 21.6 kg as option for mi2.1 and mi2.2, fix installed at mi2.3)
Tolerance: ± 0.5 %
Control - Local 14.48 cm (5.7") Colour-VGA-Touch screen IPC / PC (Option) MFRView Program, connection via LAN
Heater - Temperature range 5°C above room temperature up to 400°C (752°F), optional up to 500°C (932°F)
Temperature acquisition via 16-Bit converter
Sensors PT100 1/3DIN
Heater circuits: 2
Controller: special algorithm
Resolution: 0 up to 320°C: 0.01°C / 320 up to 500°C: 0.1°C
Variation over time in usable range: Less ±0.1°C
Spatial distribution in usable range: (0-70 mm before the die) / 60 up to 400 °C: < 0.2 °C / 400 up to 500 °C: < 0.3 °C
Measurement - Resolution digital position transducer 0.025 mm / impulse, with 20000 impulses per revolution, freely user selectable MI test range from the surface to 50 mm above the die
Resolution time measurement: 1 millisecond, time basis 48 MHz Quartz, precision 50 ppm
Power supply: Voltage: 1 x 230V AC (400°C or 500°C)
Tolerance: ±10%
Frequency: 50 Hz - 60 Hz
Protective Earthing: Earth resistance less than 5 Ohm
Short-time breaks: Less than 10 msec
Power consumption: approx. 870 W / 1 kW
Standby power: Heated at an ambient temperature of 25°C / 190°C < 130 W / 230°C < 140 W / 300°C < 220 W
Ambient conditions - Ambient temperature: + 10°C up to + 40° C
Air humidity: max. 90 % not-condensing
Dimensions device type mi2.1:
Width: 510 mm (19.2913 inches)
Depth: 380 mm (15.748 inches)
Height: 625 mm (22.8346 inches)
Weight: approx. 45 kg (154 pounds)


